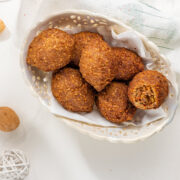
Kipes or Quipes [Recipe + Video] The Dominican Kibbeh
Learn how to make Dominican kipe or quipe with our tested and proven kipe recipe with video, and see how our readers have loved this amazing recipe.
Servings 4 servings
Calories 469kcal
Ingredients
- 1 cup bulgur (see notes)
- 1 pound minced beef [0.4 kg]
- 1 bell pepper or cubanelle pepper, very finely diced
- 2 bunches parsley chopped
- 1 small red onion very finely diced
- 3 teaspoon salt (or more, to taste)
- ½ cup tomato sauce
- ¼ cup raisins
- 2 cups oil for frying (vegetable oil)
- ¼ teaspoon pepper (freshly-cracked, or ground)
Instructions
1. Soaking the bulgur
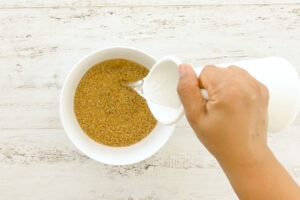
- Put the bulgur wheat in a bowl and add enough water to cover and let it rest overnight, stir a couple of times while it rests (see notes).
2. Make seasoning paste
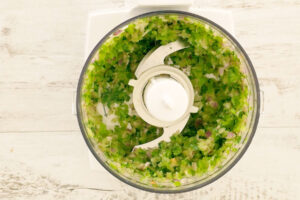
- Pulse onion and parsley in the food processor until you obtain a paste.
3. Season the meat
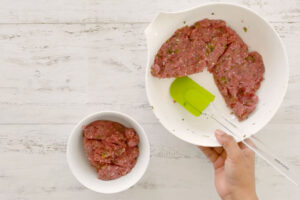
- In a bowl, mix meat, and seasoning paste. Add a teaspoon of pepper and three teaspoons of salt.Using your hands, mix the meat with the vegetables until you get a uniform mixture.Split the meat into thirds and set aside ⅔ of the meat for later use.
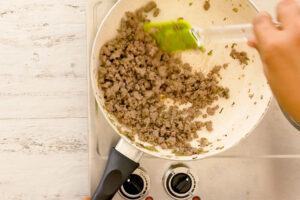
4. Cook the filling
- Heat 2 tablespoons of oil in a pan over medium heat. Add ⅓ of the meat you've taken out. Cook stirring until it's lightly browned. Add tomato sauce and mix well. Stir in ½ cup of water and the raisins and simmer over medium heat.When all the liquid has evaporated, remove it from the heat. Let it cool down to room temperature. Set aside.
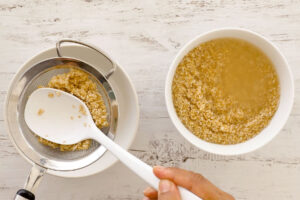
5. Drain water from bulgur
- Drain the leftover water from the bulgur and sieve to eliminate all the unabsorbed water (this is very important!). I suggest squeezing the bulgur with a clean cotton tea towel if you are not sure if there's water left after sieving.
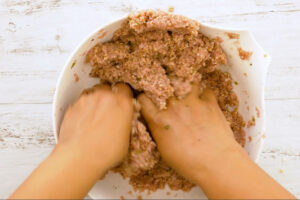
6. Make mix for crust
- Combine the remaining ⅔ raw meat with the bulgur. With your hands, mix the bulgur and raw meat, kneading it until it is mixed uniformly. This is a crucial step and may take over 10 minutes. The better kneaded this is, the better the chances of kipes not breaking apart in the hot oil. You should be left with a mixture that resembles dough. If you want to cut on time, you can also pulse for a couple of minutes in the food processor for a more compact texture, but I prefer the texture of hand-kneaded crust.
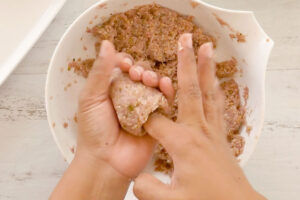
6. Shape and make kipes
- Put 2 tablespoons of the mixture on the palm of your hands and roll it into a ball.Make a deep indentation in the ball by poking it with your index finger.Place 1 tablespoon of the cooked meat filling in the indentation. Gather around the hole, closing it, and roll the kipe with the palm of your hands making it as compact as possible. Pinch the ends to give it its traditional shape.Refrigerate for at least 6 hours.
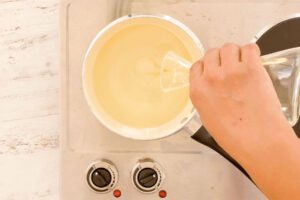
7. Heat the oil
- Pour oil into a small saucepan (so it's high enough to cover the kipes), and heat over medium-high heat (350 ºF [175 ºC]). The oil has to be very hot, cool oil will make your kipes break down and possibly ruin the oil too.
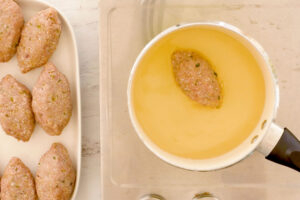
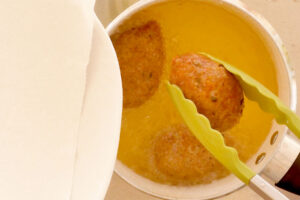
8. Fry
- When it is time to fry them give them another quick squeeze to make them even more compact.Being very, very careful with splatters (hot oil and cold liquids do not get along well) fry your kipes, preferably one at a time, carefully lowering them into the oil with a slotted spoon to avoid burning yourself.
9. Serve
- After frying, the kipe has to be deep golden brown color outside. Open the first one when you are done; if there is any pink part inside it means there is still raw meat, a bad thing, fry the next one longer. Place them on a paper towel to drain excess oil before serving.
Video
Notes
If you don't have the time to let it rest overnight, do it for at least 4 hours.
I love the taste of basil in kipe – this is not a traditional herb in kipes – but parsley is preferred by most people.
Nutrition
Calories: 469kcal | Carbohydrates: 38g | Protein: 27g | Fat: 23g | Saturated Fat: 5g | Cholesterol: 73mg | Sodium: 1987mg | Potassium: 711mg | Fiber: 8g | Sugar: 8g | Vitamin A: 1065IU | Vitamin C: 42.2mg | Calcium: 36mg | Iron: 3.9mg